
 Nederlands
 Français
 Deutsch


Tooth Gems: Troubleshooting
Having problems when applying tooth gems? Find practical solutions for common issues with bonding, application, materials and curing.
The right tooth gem size depends on the size and shape of the tooth, the desired look and the position of the crystal.
For round tooth gems, X-treme Smile uses this practical size guide:
- XXS – SS2: approx. 0.90–1.00 mm
- XS – SS3: approx. 1.00–1.30 mm
- S – SS4: approx. 1.30–1.60 mm
- M – SS5: approx. 1.60–1.80 mm
- L – SS6: approx. 1.80–2.10 mm
- XL – SS7: approx. 2.10–2.30 mm
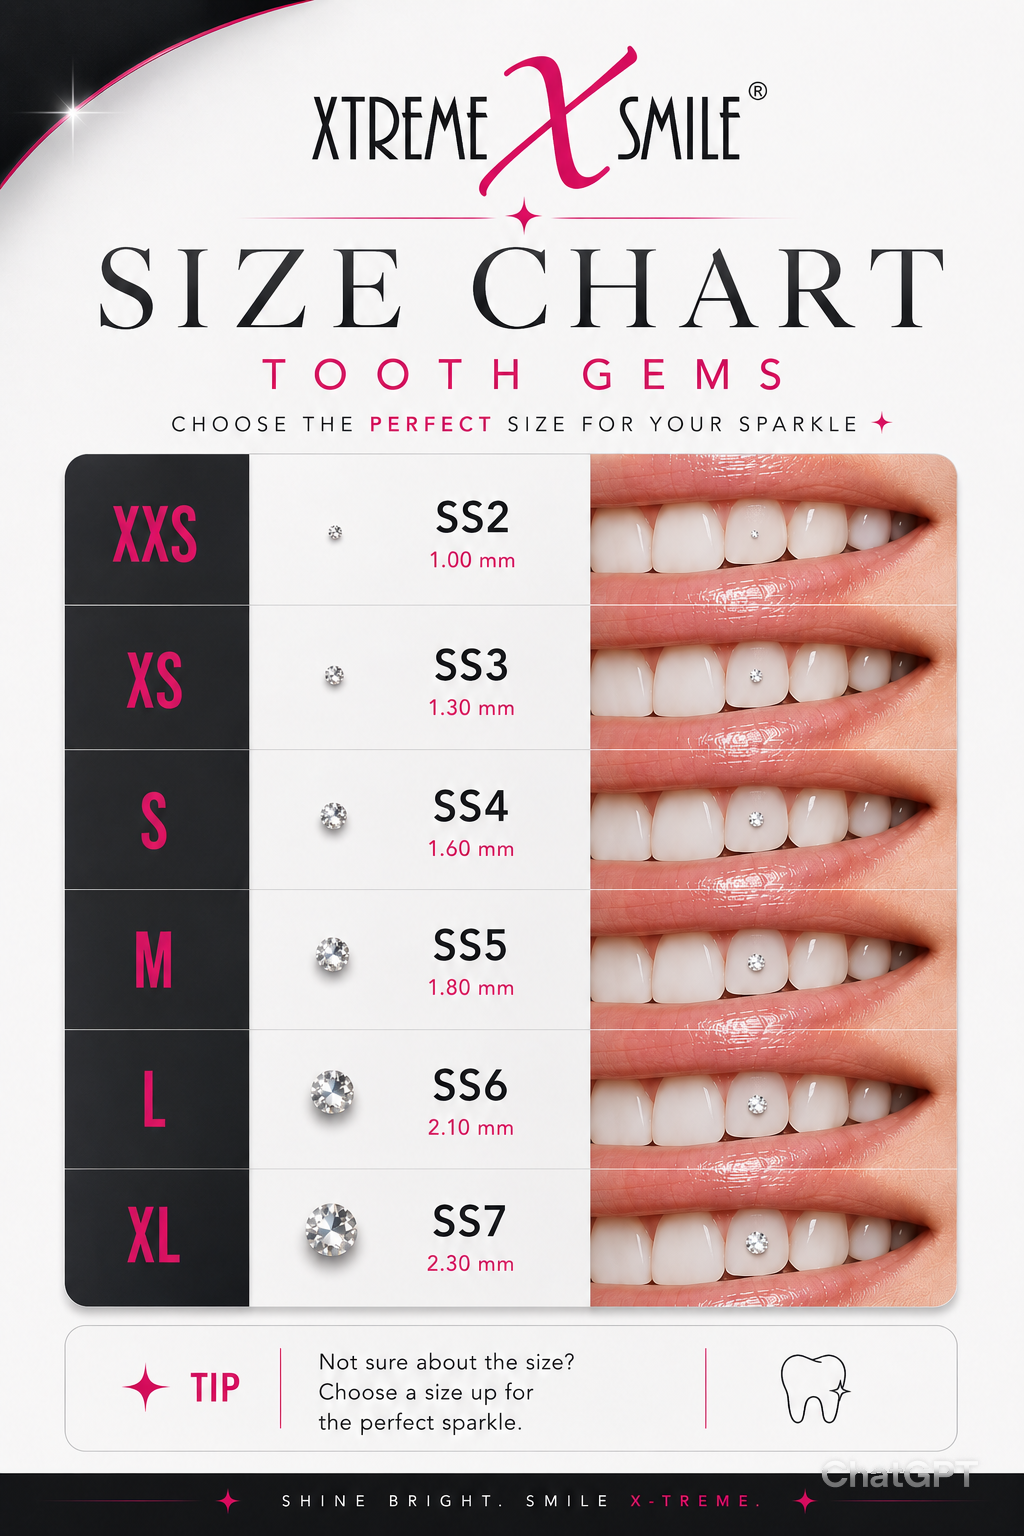
Why do we use a size range rather than one exact diameter?
SS2, SS3, SS4 and the other SS sizes are standardised size designations, but this does not mean that every individual crystal has exactly the same diameter.
Small variations can occur due to the manufacturer, brand, cut, faceting, material, production tolerances and differences between product ranges.
An SS5 from one brand may therefore be fractionally larger or smaller than an SS5 from another brand. Very small differences can even occur within the same production range.
For this reason, we deliberately provide an approximate diameter range and combine this with the easier XXS to XL system.
Why do we use XXS to XL?
SS sizing originates from the crystal and jewelry industry and can be difficult for clients to visualise. XXS, XS, S, M, L and XL provide a much more intuitive indication of how large a tooth gem will appear.
XXS and XS provide a very subtle sparkle and are ideal for multi-gem designs.
S and M are popular all-round sizes.
L and XL create a much more noticeable effect.
The same size can look very different depending on tooth size. An SS5 may appear subtle on a large front tooth but quite prominent on a smaller tooth.
Also consider the bite and placement. As a gem becomes larger, there is more surface that can potentially be contacted during biting and eating. Larger gems may therefore be exposed to more mechanical loading from foods such as hard fruit, carrots or crusty bread.
These measurements are guidelines for round tooth gems. Hearts, stars, drops, gold dental jewelry and other shapes are measured differently and cannot always be compared directly using SS sizing.
Yes. When using the BLINQ tooth gem bonding system, we recommend using all three steps in the correct order. The products are designed to work as one system, and each step has a specific function in the bonding process.
Step 1 – BLINQ Blue Etch
Blue Etch prepares the enamel for bonding by creating a microscopic surface suitable for adhesion.
Etch must be used carefully and according to the correct protocol. It should only be applied to the enamel area where the tooth gem will be placed. Incorrect use, excessive application time or contact with the gums can irritate or damage soft tissue and unnecessarily affect the enamel.
More etch or a longer etching time does not automatically mean stronger bonding.
Step 2 – BLINQ Primer
After etching, BLINQ Primer is applied. The primer provides an important connection between the prepared enamel surface and the bonding layer that follows.
Skipping this step may reduce the quality and predictability of the bond. Always apply the primer according to the recommended procedure.
Step 3 – BLINQ Glue
BLINQ Glue is used to secure the tooth gem. Once the jewelry has been positioned correctly, the material is cured with a suitable curing light.
Finishing is also important. Use enough bonding material for secure attachment while avoiding unnecessarily thick edges or excessive material. A smooth finish makes the area more comfortable and easier to keep clean.
Can I skip one of the steps?
When using the BLINQ system, we do not recommend it. Blue Etch, Primer and Glue each have their own function and are designed to be used consecutively.
Other professional dental bonding systems may use a different protocol with more or fewer steps. Always follow the instructions for the system you are using and do not randomly combine components from different systems.
Bond strength also depends on correct cleaning and isolation, keeping the tooth dry, correct product amounts, tooth gem positioning, adequate curing and careful finishing.
Correctly storing tooth gem bonding products is important for maintaining the performance and shelf life of the 3-step BlinQ* bonding system. BlinQ* Blue Etch, Primer and Glue should be protected from heat, light and contamination.
Each product label shows a thermometer symbol with the temperature range in which the product should be stored. Always follow this storage range. This is especially important during summer, because temperatures inside a salon or treatment area can rise considerably.
If you work with tooth gems on location, for example at a festival, event or outdoor setting, pay extra attention to temperature and exposure to sunlight. Never leave the products in direct sunlight, on a windowsill, in a hot car or on a sunny work table.
How to store tooth gem bonding products correctly
- keep Blue Etch, Primer and Glue within the temperature range stated on the label;
- store the products in a closed, light-proof container;
- close every product immediately after use;
- do not leave products unnecessarily open on the work table;
- never place them in direct sunlight, for example on a windowsill or sunny work surface;
- do not leave the products in a hot car;
- protect Primer and Glue especially well from UV light;
- use clean application materials and avoid contamination of the packaging;
- always check the expiry date and storage instructions on the label.
BlinQ* Blue Etch – Step 1
Close BlinQ* Blue Etch immediately after use. Remove a used application tip after treatment and store the syringe with its designated closure. Always keep Blue Etch within the stated temperature range and protected from direct sunlight.
BlinQ Primer* – Step 2
BlinQ Primer is sensitive to temperature fluctuations and UV light.* Exposure to sunlight can affect the product and may cause light-sensitive components to react or cure prematurely.
For this reason, we supply our primers in small light-proof pouches that block UV radiation. Keep the primer in this pouch whenever it is not in use.
Only remove the primer from the protective packaging when needed, close it immediately after use and place it back into the light-proof pouch. Never leave the primer for extended periods on a work table, windowsill or other sunny location.
BlinQ* Glue – Step 3
BlinQ* Glue is a light-curing product and should therefore be protected carefully from light. Daylight, direct sunlight and light from a curing lamp can affect the product.
Close the Glue immediately after use and store it in a light-proof container within the temperature range stated on the label.
The storage instructions and temperature range on the product label always take priority.
If your tooth gem keeps falling off, this does not automatically mean that the adhesive is faulty. Retention depends on the entire application process: cleaning, etching, Primer, bonding, curing, placement of the jewelry and the client’s bite.
If tooth gems repeatedly come off too quickly, it is important to review the full protocol step by step.
1. The tooth was not cleaned properly or kept completely dry
For reliable bonding, the tooth surface must be clean and truly dry. Saliva, moisture, plaque or other contamination can significantly reduce adhesion.
After etching, removing the etchant, rinsing and drying, you should see a frosty white, matte area on the treated enamel. This is an important indication that the enamel surface has been properly prepared.
After this point, the surface must remain dry.
If saliva touches the etched area again, for example because the client keeps talking or pushes saliva forward from behind the teeth with their tongue, the surface has been contaminated again. You should then repeat the relevant preparation step according to the protocol before continuing.
A practical way to help the client is to ask them to:
- place their tongue against the roof of the mouth;
- keep their mouth still during this part of the treatment;
- avoid talking until the tooth gem has been positioned and cured.
It is worth explaining why: saliva contamination can directly affect how long the crystal stays attached. Clients usually cooperate much better when they understand that talking or moving during this stage can compromise the bond.
2. Blue Etch was not used correctly
Etching prepares the enamel for adhesion. Blue Etch should be applied precisely to the intended bonding area and used according to the prescribed protocol.
After the correct application time, the product should be removed, the tooth thoroughly rinsed and then dried.
A correctly etched surface should normally have a frosty white, matte appearance.
If you do not see this effect, or if the surface has become wet again due to saliva, do not simply continue with Primer and Glue.
Longer etching or using more Blue Etch does not automatically create a stronger bond. Always follow the recommended etching time.
3. Saliva contamination after etching
This is one of the most underestimated reasons why tooth gems fail.
A tooth may have been etched perfectly, but as soon as saliva reaches the prepared area, adhesion may be compromised.
This can happen when:
- the client talks;
- the tongue presses against the back of the teeth;
- saliva moves forward around the teeth;
- the working area is not kept sufficiently dry.
If this happens, do not simply continue with Primer and Glue. Restore the preparation according to the protocol before proceeding.
A cheek retractor, good moisture control and clear instructions to the client can make a major difference.
4. Primer was skipped or applied incorrectly
Primer forms the connection between the prepared enamel surface and the bonding layer.
If this step is skipped, used incorrectly or applied to a moist or contaminated surface, the bond may become less reliable.
When using the BlinQ* system, use Blue Etch, Primer and Glue in the correct order.
5. Too little or too much bonding material was used
The tooth gem needs sufficient contact with the bonding material. Too little material may result in insufficient bonding surface.
Using a large amount of Glue is not automatically better. An excessively thick or irregular layer can make placement and finishing more difficult.
Use enough material for reliable attachment and create a smooth, neat finish around the tooth gem.
6. The bonding material was not cured sufficiently
A suitable curing light is essential.
Pay attention to:
- sufficient light intensity;
- correct distance from the tooth;
- correct angle of the curing light;
- adequate curing time;
- sufficient light exposure around the tooth gem.
A curing light that does not provide enough power, is poorly charged or is positioned incorrectly may result in incomplete curing.
7. The tooth gem position is not ideal
Not every position on every tooth is equally suitable.
Tooth gems placed on the lower teeth often have a shorter retention time than those on upper teeth. There is usually less space and more contact with the opposing teeth, tongue, food and chewing forces.
Always check the client’s bite before placement.
8. The tooth gem is large or exposed to mechanical forces
A larger or more prominent tooth gem can be hit more easily during eating and biting.
Examples include:
- hard apples;
- carrots;
- baguettes;
- crusty rolls;
- other hard or crunchy foods.
If the gem is repeatedly subjected to direct mechanical forces, the chance of it coming loose increases.
9. The tooth surface is not suitable
The most predictable adhesion is generally achieved on healthy natural enamel.
Crowns, veneers, composite restorations or damaged enamel may react differently to the bonding system.
Always assess the actual tooth surface before placing the jewelry.
10. The tooth gem does not have a suitable bonding surface
The back of the jewelry also matters.
Not every random stone, nail-art crystal or decorative item is automatically suitable for professional tooth gem bonding.
A tooth gem should have a bonding surface suitable for professional adhesion.
11. The bonding products were stored incorrectly
Blue Etch, Primer and Glue must be stored correctly.
Temperature, UV exposure and prolonged sunlight can affect the products.
Keep them within the temperature range shown on the label and store them in a closed, light-proof container. Close all products immediately after use.
12. Products from different systems are being mixed
A professional bonding system is developed as a complete protocol.
Randomly combining Etch, Primer and Glue from different systems can make the result less predictable.
When using BlinQ*, preferably use Blue Etch, Primer and Glue together according to the BlinQ protocol*.
My tooth gems keep coming off – what should I check?
Check the process systematically:
cleaning → etching → frosty white surface → complete moisture control → no saliva contamination → Primer → Glue → placement → curing → finishing → bite → product storage.
The stage between etching and bonding deserves particular attention. A perfectly prepared enamel surface can become contaminated within seconds if the client talks or pushes saliva towards the teeth with their tongue.
So do not hesitate to ask the client to keep their mouth still and place their tongue against the roof of their mouth. It may seem like a small detail, but it can make a significant difference to how long the tooth gem stays in place.
For professional tooth gem placement, you need a suitable curing light for tooth gems. Use a professional dental curing light that is compatible with the bonding material you are working with.
Proper curing is essential for retention. Even if the tooth has been cleaned, etched and kept completely dry, and Primer and Glue have been applied correctly, insufficient curing can cause the tooth gem to come loose sooner.
Why do you need a dedicated curing light?
The difference is not only the colour or wavelength of the light, but also how the light is delivered to the bonding material.
With a professional dental curing light, the light is concentrated through the light guide onto a relatively small treatment area. This delivers a high amount of light exactly where the bonding material needs to be cured.
That is very different from lamps designed to illuminate a much larger area.
What should a good curing light provide?
Important factors include:
- a wavelength suitable for the bonding material;
- sufficient light intensity;
- a concentrated light beam;
- the correct curing time;
- the correct distance from the bonding material;
- the correct angle of the light;
- a sufficiently charged battery;
- a clean light guide without cured bonding residue.
Always follow the curing instructions for the bonding system you are using.
Can I use a nail lamp for tooth gems?
We do not recommend using a UV or LED nail lamp for tooth gems.
A nail lamp is designed to illuminate a relatively large area and cure gel or other nail products across several nails at the same time. The light is therefore spread over a wider area.
A dental curing light works differently. The light is concentrated through the light guide onto a small area, exactly where the dental bonding material needs to cure.
So even if a nail lamp emits blue or UV light, this does not mean that the tooth gem bonding material receives the same effective light intensity.
A nail lamp may also have a different wavelength range and curing performance from what the dental bonding material was designed for.
Can I use my teeth whitening lamp for tooth gems?
A teeth whitening lamp is also not a substitute for a dental curing light.
A whitening lamp is designed to illuminate a large part of the mouth at once, so the light is distributed across several teeth.
For tooth gem bonding, you need the opposite: concentrated light on a small bonding area.
A whitening lamp may look powerful and produce a large amount of light, but this does not mean that the tooth gem bonding area receives the same effective intensity as it would from a dental curing light.
In simple terms:
- Nail lamp: light spread across several nails.
- Teeth whitening lamp: light spread across a large part of the teeth.
- Dental curing light: concentrated light delivered through a light guide directly onto the bonding material.
Keep the curing light close to the bonding area
Distance and position also matter.
The further the light source is from the bonding material, the less effective light may reach the treatment area. Hold the light guide as close and as straight as possible to the tooth gem according to the protocol, without moving the jewelry.
Make sure the bonding material around the tooth gem can be reached properly by the light.
Extra important with gold tooth gems
With gold tooth gems and other opaque dental jewelry, light cannot pass through the jewelry itself.
The bonding material therefore needs to be cured properly from the accessible sides. Position the curing light carefully and make sure the bonding around the jewelry receives sufficient light according to the protocol.
Check your curing light regularly
Even a professional curing light can become less effective over time. Regularly check:
- whether the battery is sufficiently charged;
- whether the light is functioning correctly;
- whether the light guide is clean;
- whether cured bonding residue is blocking the tip;
- whether the light guide is damaged.
Cured bonding material on the end of the light guide can block part of the light and reduce the effective light output.
When using the BlinQ* bonding system, combine Blue Etch, Primer and Glue according to the BlinQ protocol with a suitable professional dental curing light*.
The curing light lifespan is generally shorter than many users expect. While a teeth whitening lamp can often be used for many years, the average practical lifespan of a curing light in professional use is usually around 6 months to 2 years.
Some lamps last considerably longer, but a curing light can unfortunately also fail earlier. Its lifespan depends on the quality of the lamp, how intensively it is used and, above all, how carefully it is handled. There is also simply an element of luck involved: two identical lamps used in the same way do not necessarily last exactly the same amount of time.
So consider 6 months to 2 years an average practical lifespan, not a guaranteed lifespan.
Why does a curing light usually last less long than a whitening lamp?
A curing light has a very different function from a teeth whitening lamp.
A whitening lamp spreads light over a large part of the teeth. A curing light, on the other hand, uses a light guide to concentrate a powerful beam onto a very small area, allowing dental bonding material to polymerise properly.
A curing light is also a compact device in which a powerful light source, battery, electronics and light guide all work together. With professional use, the lamp may be switched on and recharged several times per day.
The type of load and application are therefore very different from a whitening lamp, so their lifespans cannot be compared directly.
Curing lights range from around €60 to over €1,500
Professional dental curing lights are available in very different quality and price ranges, from around €60 to more than €1,500.
Fortunately, you do not need a curing light costing hundreds or thousands of euros to place tooth gems professionally.
What matters most is that the lamp:
- provides sufficient light output;
- concentrates the light effectively;
- is suitable for the bonding material being used;
- functions reliably;
- is used correctly.
Our Metal-X and Speedy-X have been specifically developed for professional tooth gem bonding and provide sufficient concentrated light output for this purpose.
Metal-X: curing time approx. 30 to 60 seconds.
Speedy-X: fast curing in approx. 2 to 10 seconds.
With only a few professional tooth gem treatments, the investment in the lamp is usually earned back quickly.
The battery is a wear component
A cordless curing light uses a rechargeable battery. Just like a mobile phone battery, its capacity gradually decreases after many charging cycles.
With intensive use, the battery may eventually:
- run down more quickly;
- operate at full power for a shorter period;
- need charging more frequently;
- eventually fail.
A lamp that still switches on therefore does not automatically perform exactly as it did when it was new.
The light guide is fragile
The light guide is an important part of the curing light. It concentrates and directs the light towards the bonding material on the tooth.
Because the light guide is made of glass, it can be damaged if the lamp is dropped or knocked against a hard surface. Handle the lamp carefully and place it somewhere secure during treatments.
Our tooth gem curing lights come with a 1-month warranty. The glass light guide is excluded from this warranty.
Keep the light guide clean
Check the end of the light guide regularly.
If the tip touches uncured bonding material during curing, a small amount of bonding can remain on the light guide and then harden.
If this happens repeatedly, a layer can build up and block part of the light. The lamp may still appear to work normally, while less effective light actually reaches the bonding material.
Avoid placing the light guide directly into wet Glue or bonding material and keep the tip clean.
Heat is not good for a curing light
High temperatures can also have a negative effect on the battery and electronics.
Do not leave a curing light for long periods:
- in direct sunlight;
- on a sunny windowsill;
- inside a hot car;
- on a hot work surface;
- unprotected in the sun during a festival or event.
If you regularly provide tooth gem treatments outdoors or on location, protect the lamp from direct sunlight and excessive heat.
There is also a little bit of luck involved
Even when a curing light is handled carefully, it can sometimes fail earlier than expected. Electronic equipment remains subject to differences between individual components, batteries and units.
One lamp may work perfectly for several years, while another needs replacing much sooner.
So yes, there is also a little bit of luck involved. That does not mean maintenance is unimportant. Careful use can reduce the risk of premature problems and help your lamp perform properly for as long as possible.
Take good care of your curing light:
- do not drop it;
- protect it from heat and direct sunlight;
- keep the light guide clean;
- prevent cured bonding residue from building up on the tip;
- charge the battery correctly;
- store the lamp safely after use.
When should I replace my curing light?
Watch for signs such as:
- the battery running down noticeably faster;
- the lamp no longer charging properly;
- visibly reduced light output;
- the lamp switching off unexpectedly;
- a damaged light guide;
- unusual heat during use;
- inconsistent operation;
- bonding seeming to cure less effectively despite following the correct protocol.
An important point: visible blue light does not automatically mean that the lamp is still delivering optimal light output.
For professional tooth gem placement, a reliable curing light is an essential part of the bonding process. If you are unsure about your lamp's performance, it is better to have it checked or replace it than to simply keep increasing the curing time.